Simple Pumpkin Decor

My kids love to play ‘pretend’ trick or treat year round with their plastic pumpkin buckets. The only problem is I wanted to use them for a simple craft idea this year. We recently moved and I wanted to use them as an outdoor decoration. So the other night I told them, using a phrase I never thought I’d use. “When I was your age, I used a pillow case, because you could get more loot!” I successfully convinced them to switch over to pillow cases, so I took their pumpkins and my husband helped me cut and hang these sweet easy pumpkins.

Directions: Simply cut off the back half of the pumpkin, leaving the handle in tact for hanging. Hang and enjoy!

Cheers and enjoy!

Leave a comment

Filed under Thrift Crafts

Say Goodbye to Paper Sign Up Sheets w/ Free Resource

Have you ever been handed a “Sign Up Sheet” to carpool, bring snacks, potluck, volunteer, etc?

Or are you needing to coordinate a gathering and need people to pick a job?

Put the pen and paper down and go directly to this free resource. You can create an online sign up sheet for Free!

GOODBYE PAPER SIGN UPS!

www.SignUpGenius.com

My party and event planning just became easier and its FREE!

Cheers to your Thriftliving!

Tash


Leave a comment

Filed under Uncategorized

3 Gift Giving Concepts with meaning and little cost!

Each year in my various mom’s groups, mom’s circulate ideas on how to bring meaning into Christmas gift giving and also one that is pleasing to the budget.

Here are two of my favorite ideas:

1. Give each child 3 gifts, just like Jesus was given 3 gifts from the wisemen.- Submitted by Wendy.

2. For advent, wrap up 25 books and the children get to open one book each day. The books can be Christmas related or not. I love this idea! -Submitted by Susan. (Tip: Shop your local Thriftstore for books throughout the year, or you can order books from Amazon for 99cent used books + Shipping in many cases., or support your local school if they offer Scholastic book orders.)

3. Santa’s only involvement: ‘Santa’ drops off ‘pre-washed’ Christmas pj’s on the door step each Christmas Eve. As your children get older and no longer believe in Santa, it becomes a fun game to try and catch ‘Santa’ in the act. 🙂 -Submitted by Janet.

Its not too late to implement these ideas. If you already bought more than 3 gifts, start returning or giving them away to others.

Cheers to your Thriftliving!

Tash

2 Comments

Filed under Thrift Money

Large Chalkboard Idea for under $10!

Several months ago, our Chalkboard Easel Broke. I must say I’m not too sad, because it took up so much space and in our small area, space is at a premium. I went on a hunt for a large chalkboard I could hang on the wall and to my surprise they began retailing around $100. I loved it, but at that price I preferred my kids stick to paper and crayons. I tried Chalkboard spray paint which is great, but messy. Then Until I came across this little secret…

I have not been ready to reveal my secret until now…

Chalkboard Contact Paper….AND AGAIN I SAY REJOICE!

And again I Say Rejoice!

This Chalkboard Contact is phenominal for many reasons:

-it has a sticky back. It is removeable, reusable and does not leave a sticky residue on surfaces.

-it washes clean easily

-there is a lot in one roll, so you can make multiple chalkboards or cover a chunk of wall

Its many uses:

-Picture Frame Chalkboard: Buy $1 Foam Poster board, Apply the sticky contact paper to the foam board. Cut to size of picture frame. Place in picture frame and hang.

-Cut your own custom Chalkboard Labels

-Cut and apply to your refrigerator for a magnetic Chalkboard.

Apply Direct to your Refrigerator

-Apply to a framed cork board. One side Cork and cover the other side with chalkboard contact paper.

-Place direct on walls in your kids play rooms or over a dining room table.

-Make travel sized chalkboards using foam board, they are light weight and fit easily in a back pack.

-Apply to any magnetic surface for a combination Magnetic Chalkboard.

-Make chalkboard placemats for the dinner table.

-Place a strip on the dashboard of your spouse’s car and write him love notes.

-Cut out wall decals and apply to any room!

-Shop for unique frames at a thrift shop or garage sale and fill with contact paper for a stylish and unique chalkboard.

Shop thrift shops/Garage sales for unique frames


Covering a Larger Surface?
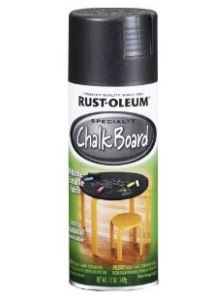
Spray-on Chalkboard Paint is recommended.

*Please note when painting, to not use in a breezy area, the paint will go everywhere.

Want a Magnetic Chalkboard Surface?

Spray Chalkboard Paint on a metal magnetic surface or Use Spray-on Magnetic Paint first. Let it dry.

Once dry. Spray Chalkboard paint over top or roll on Chalkboard Contact paper.

If you complete this project, I would love to see your photos!

Cheers to your Thriftliving!

Tasha

Leave a comment

Filed under Thrift Home, Thrift Kids

Remove Grease and Deter Bees with a Dryer Sheet

Watch this quick video to see for yourself how a simple dryer sheet removes grease from a pan. (Yes that’s my hands in the video!) Click here to view.

Click to ViewClick here to view

Prior to learning about removing grease from a pan with a dryer sheet, I had learned that it would repel insects especially bees. Golfers have been known to place one in their back pocket to keep the bees away. I typically hide one under my picnic table clothes at parties day or night and it repels the insects from the food and the guests sitting at the table.

Its also worked well on our old George Foreman Grill where we can’t remove the grill tray. With a simple wipe of a dryer sheet, it cleans up quick.

Tip: Buy unscented dryer sheets, cut them in half. They have the same power in-half as they do whole. I prefer Bounce, but really any dryer sheet will work.

For more information on the many other uses of a dryer sheet click here.

Cheers to your Thriftliving!

Tash

Leave a comment

Filed under Uncategorized

Sweet Tea, Food Storage and Old Jars=Sweet Hospitality

Typically, I cast my sauce jars in the recycle bin because I lack time to clean and store the jars. Life is ‘busy fast’ and often I find myself grabbing whats quick and easy. However, as I continue to connect with my ‘citry’ life (country-city life), I find myself going back to basic elements that remind me of home. Mason jars in their simplest form are my favorite country element.

Sweet Tea and Flowers

When I think of re-using a Mason jar I think of putting fresh cut flowers in them. To quote one of my favorite lines from Waynes World but replacing the words gun and gun rack,  “I don’t even own a flower bush, let alone many flower bushes to necessitate an entire shelf of mason jars. ”

Finally it hit me, Instead of buying the plastic disposable food storage containers, why not use jars? Not only are they already paid for as you buy sauces, jams and other goods in them….THEY LOOK GORGEOUS! In addition, they can store everything from Sweet Tea to BBQ Pulled Pork.

Thrifty Idea: The next time you are headed over to a friends house, and you want to bring a house warming gift and you are like me and have no flower bushes, simply pour some sweet tea into a jar, tie it with a ribbon or raffia, write out a quick label, and wha-la you have a unique ‘thank you for having us’. In addition you’ve left your country stamp in a busy world reminding people to appreciate the simple things in life.

Tip: When removing the labels from your jars, simply wet the label and peel off. To remove the sticky remnants use a dryer sheet.  Simply wet the dryer sheet and apply to surface. You can also use a Magic Eraser. The magic eraser will also remove the ink date stamp on the jar too.

Mason jars remind me so much of ‘Baba’, my grandmother. She had this incredible simple basement in the bottom of an old historic brick house. It was simple and stripped down. One side filled with the old-fashioned washing machine, and the ceilings adorned with rope strung across the room with wooden clothing clips. The other side was shelves and shelves full of filled mason jars with this years canned peaches, jams, and many other fillings. Every time, I pull out a mason jar it reminds me of her and I can still smell her basement. It was a scent where the homemade canned peaches had baked their smell into the walls.
Cheers to your thriftliving!

Tash

Leave a comment

Filed under Thrift Hospitality

Cool off a room quickly with this simple fan trick!

Hot days of summer are finally here. Living in the bay area a majority of homes do not have Air Conditioning. At night it cools off but if there is no breeze it’s difficult to get the cool air in.
Here’s a way to cool off a bedroom at night by using a fan.

When I was growing up in Iowa my Dad to save money would turn off our AC at night. Now living where aAC is not an option I’m grateful for this trick.

Step one: Simply open two windows. Side by side. If it’s a window and a door it should work but they must be on the same wall.

Step two: Close the doors to the bedroom sealing it off. All doors and additional windows should be closed.

Step three: place a fan facing out of the window on high setting.

Step four: turn on the fan and make sure the doors stay closed and be amazed.

The air will automatically circulate in the cooler outside air. It creates a circular motion of air by pushing out hot and pulling in cool.

For those who do have AC and would like to save $ on energy try this trick and enjoy the fresh air and sounds of summer outside.

This trick is like baking a turkey upside down. It doesn’t make sense exctpt the results are phenominal!

Cheers to your Thriftliving!

Leave a comment

Filed under Thrift Home

Thrifty Kids Birthday Gift Idea

Since March, we’ve been on the birthday party circa. I love the birthday party circa, because it combines my two favorite loves, community of friends and awesome free food that someone else made! (As a side note to my friends reading this post, if you have ever felt unappreciated after hard work from serving food at a party, let me be the one to say, I Greatly appreciate the hard work, and I’m thankful for the meal.)

In the past two weeks we’ve had six invitations and we’ve gone to four. Initially when we started, I would take the kids down to the toy shop, and let them pick out something. But then the trip resulted in them crying as they wanted to buy something for themselves, or I get talked into an additional $15 purchase. So my $10 birthday gift has now turned into $25 or $10 with tears, and having to hear about it at the dinner table as they rat on me to Dad, that I didn’t buy them the ‘special car’ or ‘special doll’.

I had to find a solution, and I did from my sister, Tanya:

One Dollar Bill

Gift Solution: We give $1 per year of the child. We give it in actual $1 bills. Ex. 4-$1 bills for a 4 year old! Its also a great idea if you don’t have time to always go shopping for a gift, or you are invited at the last minute.

The Money Savvy Pig from http://www.msgen.com

My kids decorate a blank card, put the money in the card/envelope, and then we wrap the card with ribbon or put it in a recycled gift bag. That way they feel they are giving a special gift.

If I am going to a 1 year old birthday party, I’ll buy a piggy bank and give $1. My favorite piggy bank is from http://www.msgen.com.

Card Stock with Envelope

For Birthday Cards: I buy:

-50ct. pack of stock cards w/ envelopes for around $7 at the craft or office supply store.

-Bulk pack of stickers (for boy and girl) $3 or I shop garage sales for cheap stickers.

-Crayons $30 cents. I keep these crayons in my craft box, so they are kept in good condition.

Directions: Simply have your child write ‘Happy Birthday’ or if they can’t write, write it for them. Then let them color and decorate with stickers. Remember: this is from them, so let them decorate it. Anything goes. For instance, my daughter covers the whole “Happy Birthday” part with stickers…. but its her card to give.

Wrapping Paper and ribbon: I buy one roll of Apple Green Solid Wrapping paper and white ribbon.  Apple green is perfect as slime green for boys or fairy princess green for girls. If I don’t have wrapping paper, I substitute paper bags, tin foil or newspaper.

We were at a party recently where the little girl and her friends were tearing through the big gifts and wrapping paper and she was going through the motion. My son handed her the wrapped card, she opened it and yelled,  “DOLLARS, MOMMY, I GOT DOLLARS.” My son got the reaction he wanted, and my wallet also got the reaction it wanted.

Cheers to your thriftliving, and I wish you great free food at your next event!

Tash

1 Comment

Filed under Thrift Kids

Travel Tip: Freeze your Milk, Bread and Cheese before you travel!

Milk, Bread and Hard Cheese

When we fly back East to visit my family, our return flight into San Francisco always returns around 10-11pm at night. By the time we get our luggage, car and home, its midnight. The last thing I want to do is go to the store at midnight.

So before we leave we put our milk, bread, and cheese in the freezer. When we return, we put it in the fridge to thaw overnight, and wha-la, we have milk and bread to get us through the morning.

Milk Disclaimer: Use frozen milk within a month. Make sure to only freeze milk in plastic containers or freezable jars. Milk may be grainy when thawed, but I find its just fine in cereal and to get us through the next morning until we can get to the store. Make sure there is 1/2 inch of space between the lid and milk to allow for expanding.

Bread Disclaimer Use Frozen bread within 2 months.

Cheese Disclaimer: Hard or semi-hard cheese can be frozen if cut in 1/2 to 1-pound blocks. Wrap in plastic wrap and then put in freezer bags. After freezing, cheese may become crumbly and mealy, but, it will retain its flavor. It works best for cooking.

Plan to use frozen cheese within 4 to 6 months. Thaw cheese in the refrigerator. Use soon after thawing.

The cheeses that freeze best are brick, Camembert, cheddar, Edam, mozzerella, muenster, Parmesan, provolone, Romano and Swiss. Blue cheeses are more prone to becoming crumbly but they’ll still taste good. Cream cheese and cottage cheese do not freeze well.

Cheers to your Thriftliving!

PS-This is a great tip for everyone except our neighbors, because we enjoy drinking your milk and eating your bread while you’re gone. Ya know, we do what we can to help out our neighbors! 🙂

Leave a comment

Filed under Uncategorized

Pill Box Organizer=Portable Jewelry Organizer!

My Jewelry Drawer, and yes thats a tampon!

So I didn’t want to admit it, but my I have a problem with organizing my jewelry. The picture says it all, and yes that would be a tampon in my jewelry drawer. What I love is that my ring holder is not even holding my ring. Apparently every morning I find what I need out of this system! They say the first step to recovery is admitting you have a problem. Well, I’m on my way to recovery.

I found this Twice A Day Pill Box at the Dollar Store. The solution is simple.

Step 1: Place matching earrings and jewels in the same compartment.

Step 2: Remove the pill box lids, but make sure to save the lids.

Step 3: When you travel, simply place the lids back on and Wha-la you have an instant portable jewelry case that keeps you organized even on Vacation!

Other Uses: Small craft organizer, Rewards system, and

Travel Tip: Only take the jewelry you need, in the empty compartments, utilize the space for hair bands, pills, gummy bears, coins, or whatever little trinkets need to be contained.

I hope you enjoy this little organization system as much as I do. Its saved me a lot of time in the mornings when I’m looking for my earrings and the kids are at the front door ready to get in the car. (actually, that’s a dream I have is my kids being ready at the front door when I need them too. But now I have extra time to get them ready and to the front door because I’m not looking endlessly for my matching earrings. )

Cheers to your Thriftliving!

Leave a comment

Filed under Thrift Couture